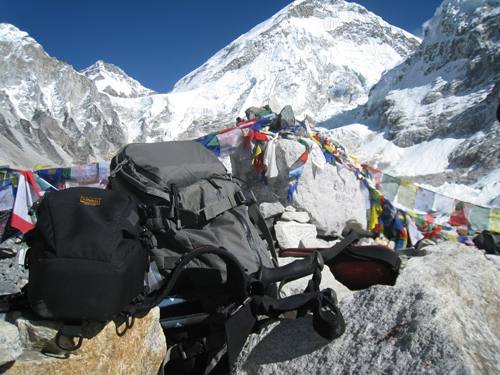
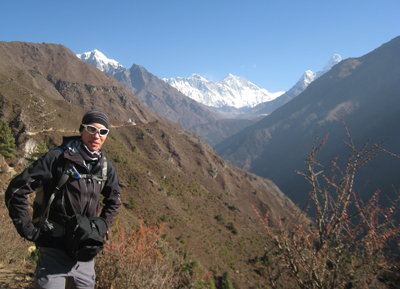
For years, camera enthusiasts have been searching for an acceptable carrying system on the trail. Photographers have a couple of specific needs: to haul a bulky and heavy array of camera gear in addition to backpacking essentials, with quick and available access to the camera body. So far, many products on offer have fallen a little short, however I’m quite pleased to present my solution that worked well on the two week trek up to Everest Base Camp.
What I’ve tried so far
First, I’d just like to revise what I’ve tried so far, and why it hasn’t worked out.
- Dedicated camera backpack (Crumpler Whickey and Cox, and Lowepro Pro Trekker 300 AW)
The Crumpler Whickey and Cox (now Crumpler Karachi Outpost Medium Size) and Lowepro Pro Trekker 300 AW are bags that don’t scream ‘expensive stuff to steal inside!’. The interior only contains divisions for camera bodies, lenses and accessories, with no room for a warm jacket or bottle of water. This makes them hugely impractical if walking more than a few hours. Luckily Nicole has been on hand to help out with these essential needs!
- Shoulder bag with backpack conversion strap (Domke F2 with FA-100 backpack strap)
The Domke F2 is a great bag for shooting around town. Working out of a shoulder bag is unbeatable for accessibility to the camera, quick draw and stowaway with the ability to change lenses. The F2 holds a tonne of gear for its size and it looks stealthy. No wonder it’s a popular choice for photojournalists around the world.
Domke make an attachment which attempts to convert the F2 into a pseudo-backpack. I thought this sounded like a great solution for an overseas trip that would mainly involve wandering around cities, markets and festivals, but where the bag could also be converted for the occasional day-hike. Problem is, for me the FA-100 just doesn’t work well. There’s no padding, so the straps cut into your shoulders. In addition, the weight of the bag doesn’t sit too well on the hips, it’s all on the shoulders which is not ideal. In addition, there’s no convenient way to attach a tripod. I tried it out once on a short bushwalk in Australia but this was enough to make me retire the FA-100 asap.
- Regular backpack (Deuter Quantum daypack) with Domke insert, carrying tripod separately
I was a bit unprepared for the Inca trail, the only daypack I had on hand was a regular 15L backpack, so I packed in the Domke insert from the F2 and got on with it! I also carried my tripod separately, slung over my shoulder. Needless to say this didn’t work well at all. I ended up carrying the camera for most of the walk in my hands under the protection of my poncho due to the teeming rain, as the backpack was not waterproof. In addition, the small daypack wasn’t designed to carry heavy camera equipment, and I ended up ripping off one of the shoulder straps. Don’t even get me started how silly and uncomfortable it was to carry a tripod over one shoulder for 4 days!
- Hiking backpack (Deuter Quantum 55) with Chest bag (Lowepro Toploader 75AW)
I tried hiking around Patagonia with the Lowepro Toploader clipped onto the backpack shoulder straps. This gives great access to the camera, while all other gear and lenses go into the backpack.
The disadvantage with this method is that the chest bag tends to drag the whole backpack forwards and downwards. Usually when you fit a backpack you want the weight to be distributed to the hips. Even if the backpack is well-fitted, the chest bag pulls everything onto your shoulders making it extremely uncomfortable. I also tried wearing the chest bag separate from the backpack using the harness that Lowepro offers. While this didn’t pull the pack down, I felt there was still too much weight on the shoulders. In addition, the bag obscures your view immediately in front, making it tricky to walk down steep trails or stairs.
My solution?
These are the bags I used on a 14 day hike to Everest Base Camp. On this trip we were supported by porters, and only had to carry items needed during the day.
- F-stop Loka Backpack
- Kinesis C380 holster case worn around the waist on a kinesis standard padded belt


The Loka backpack is close to the perfect photographer’s daypack. It’s similar to a regular hiking backpack, but F-stop offer a series of different sized camera modules (ICU) to slot inside. For more information, read this review. To pair with it, I wanted the smallest waist pack which would hold a camera body with zoom lens attached and chose the Kinesis holster.
I found this combination worked really well. Here’s why:
- Access to the camera is right in front, which makes shooting easy and fast. When you have to set the backpack down, and unpack the camera every time to take a shot, usually it’s a case of ‘can’t be bothered’, or you irritate your hiking buddies and end up not taking any photos.
- The weight of the camera is around the hips. The ICU of the Loka is also located at the bottom of the backpack, which is where the heavy items should be.
- The waist bag doesn’t obscure your field of view as much as a chest bag, which makes it easier see directly in front to walk down slopes.
- The Loka has a lot of straps and attachments. You can put a tripod on the back, and trekking poles on the sides if you desire.
- Dedicated partition in the backpack for other lenses and accessories, while still having room for gloves, clothes etc. You can customise the amount of space to dedicate to camera gear by putting in a smaller or larger ICU.
- The Loka has a pouch which fits a Camelbak water bladder – very handy!
- F-stop make a raincover which can be stashed underneath the pack. This was very useful!
- The kinesis system is also modular. If you want to add a lens case, or filter pouch to the waist belt – you can!
There are still a few ways I feel the Loka could be improved:
- The shoulder height of the harness is not adjustable. I’m fortunate in that the Loka fits me reasonably well, but it would be uncomfortable for those with longer or shorter torsos.
- The walls of the ICU aren’t really stiff enough. I found they tend to collapse and deform under the weight of items on top.
Obviously the perfect solution for hiking with a DSLR needs to be tailored to the type of hike you are undertaking, and the goals for your photography. If you need to carry more gear, then F-stop make slightly larger backpacks – the Tilopa and Sartori. Alternatively you could consider throwing an ICU into a regular 70L backpack. If you’re going to be doing any sort of climbing or scrambling, then you probably don’t want a bag hanging off the front. However for most non-technical hiking, where comfort and ease of access to the camera are important – consider the backpack and waistpack combination.
Updated 9/10/12
How do you carry your DSLR while trekking? Post a comment below.
Your solution to hiking with a DSLR makes the most sense of all of all of the research I’ve uncovered on this subject. Thank you for sharing your findings with others. I will be pursuing this solution. I have two questions.
First question: You note that the height of the shoulder harness on the Loka is not adjustable but fits fits you well, How tall are you?
Second question: Does the Kinesis belt interfere with the hip belt for the Loka? How are these arranged?
Thanks,
Charles Zabielskis
I’m 178cm tall and of fairly average proportions.
I put the Kinesis belt on first just above the hips and the Loka belt fastens around underneath. I suppose it could get quite hot in warm weather, but I certainly didn’t have that problem in Nepal!
Good one. I personally found this one to be almost perfect:
http://www.clikelite.com/products/hiker/
It is a hiking/camera-dedicated hybrid, perfectly built and ideal for hikes up to a week long.
The only flaw i found is the narrow shoulder straps – they start killing me after a couple of hours of hiking.
And unfortunately you haven’t placed a ‘subscribe’ button on your post!